 We evaluated the Mycusini chocolate best 3D printers. Does it deserve a chef's kiss or is it half-baked? Have a look at this evaluation for our take.
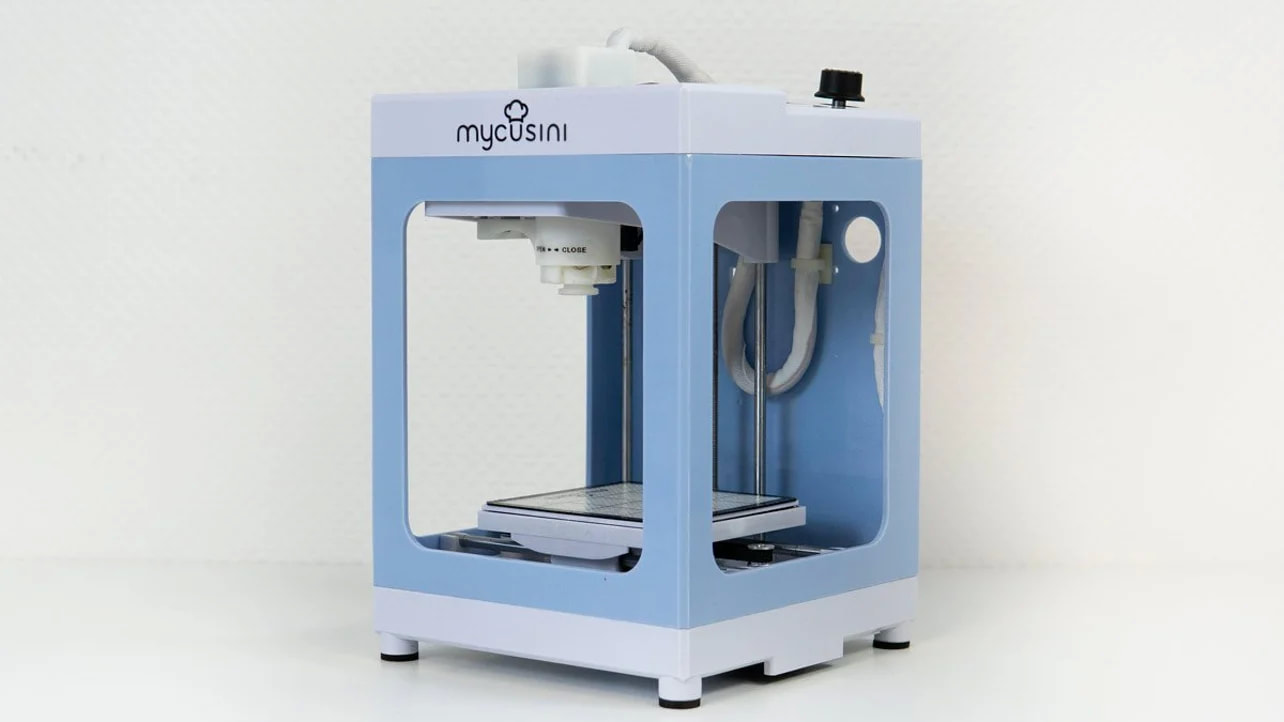
Whether you're a seasoned house chef, a confessed chocoholic or a 3D printing addict, the Mycusini chocolate 3D printer is a tempting gizmo to acquire. Built by Print2Taste, a German start-up that additionally makes the Procusini food 3D printer, the Mycusini is potentially the least expensive food printer on the marketplace right now. It was launched on Kickstarter for just shy of 200EUR (~$ 220) and also at 190 x 195 x 270 mm, it's compact enough to fit on a kitchen area countertop or be stored in a cabinet. Print2Taste surpassed its Kickstarter goal, as well as the makers, have been sent, yet you can still acquire a Mycusini from the internet site for 398EUR (~$ 440.). It looks like a treat, however, are its chocolate confections also? Read on for our review of this budget-friendly food printer. MYCUSINI. Be the host with the most with the Mycusini chocolate best 3D printers. Verdict. This little machine is surprisingly proficient at creating chocolate confections. It's pretty quick and also the chocolate it produces tastes like, well, chocolate. Is it perfect? Not quite, but it's off to a strong start. At practically 400EUR (~$ 440), it sets you back just a little less than a Kitchenaid stand mixer, the best home-cook gadget, but uses remarkable convenience and also the possibility to produce easily in chocolate. Pros. Easy to use-- no 3D printing understanding called for. Prints accurately. Huge collection of prints. Mycusini Club gives you the freedom to print (virtually) anything. Disadvantages. Messy. Refills are pricey as well as a little wasteful. Can not swap refills mid-print. First Glance. Smooth, fast, and also accurate. The Mycusini comes snugly packed in its box as well as is straightforward to construct. It has a clean, sleek look-- the cables are nicely completed so they do not hinder-- and also is made generally of plastic, that makes it simple to clean. This tiny gizmo would fit easily in a cabinet or on a kitchen countertop as well as has to do with the dimension of coffee equipment. You can manage the maker using a handle on the side of the LCD screen, which displays the portion of delicious chocolate staying and also how far along the print is. Though the Mycusini comes with an outstanding food selection of items it can publish out, it also offers the adaptability to generate your versions with its Mycusini Club platform. The display is conveniently controlled by the knob on the. Setup is straightforward as well as exceptionally straightforward. The only concern we faced was leveling the developed system, which was originally too high. We ended up tightening up the screws on it so the detachable develop plate sat lower in it. This way, there is enough space between the build plate, removable mat that sits on top of it, as well as the nozzle. It was smooth sailing when this was taken care of. Printing. The Mycusini is skilled at handling great information, but it does deal with overhangs. As far as printing goes, we were amazed. With all the settings dealt with on the Mycusini, we had a stop working price of absolutely no as well as the maker extruded the chocolate equally and also accurately. Yet, allow's back it up a bit and break down how the printing in fact functions. The Mycusini prints utilizing dissolved delicious chocolate. The delicious chocolate you make use of in it, which comes plastic-wrapped as well as resembles sausage-shaped logs secured at either end with metal spins, is called refills. Each maker comes with 10 refills and also you can purchase even more as you require them. You have to reduce the refills in half before you can start publishing with them, as well as the firm stresses that you need to get it specifically in the center. They also give a laminated printout of the refill with a line in the middle to show you where to reduce. Our refills were ever before so a little longer than the one in the picture, so we still had to eyeball it a little. The chocolate is quite strong so make sure you have a sharp knife and keep your fingers off the beaten track. As soon as you've sliced them in half, you placed one fifty percent right into the silver cartridge, open side down. The refill (chocolate log) should not be longer than the cartridge. As discussed, however, ours were, so we had to slice several of the chocolate out of each side-- squandering it-- up until the refill, half was short enough to fit in the cartridge with a couple of millimeters of the area at the top. Next off, you placed the cartridge into the white cartridge owner and twist it to the right to secure it. It calls for a little even more press than you might believe the plastic maker can handle, however simply go for it. Once it's in, calms down for a 10-minute wait while the maker warms up. Mycusini states the factor the device takes so long to heat up is that it needs to extremely gradually thaw the entire refill from the outside in without overheating it and damaging the structure of the delicious chocolate. Once heated up, the equipment extrudes chocolate by pushing down on the shut part of the refill and forcing the melted delicious chocolate near the bottom out of the narrow nozzle. You obtain the printer to start extruding chocolate by turning the control knob to the right until you have got a stable circulation of chocolate. You struck the printer and the knob will obtain to work once you're satisfied with the flow (a somewhat wasteful procedure). Abort the print as well as transform the handle better to the right the following time if it's under-extruding. However, as soon as you have obtained the circulation right, you can continue printing objects back to back without needing to reset the circulation. If you're planning on maintaining the device in an area where other individuals are working or need any kind of tranquility, think again. The Mycusini, when printing, sounds slightly like the dial-up Internet, for those old enough to remember. When we obtained our Mycusini up and running-- once more, an active, straightforward procedure-- we were impressed with the degree of information as well as level of smoothness of the prints, though they are relatively fragile. They're also a cinch to eliminate from the drooping floor covering that takes place top of the developed plate. The chocolate is very easy to eliminate. And also, though the process is simple, it does feature caution. You need to have sufficient delicious chocolate left in the refill to complete your prints. There isn't a way to stop a print mid-way as well as fill up a cartridge should you start to run low, however. In regards to preference, the delicious chocolate isn't anything unique-- it's made with sugar, fully hydrogenated veggie fats (coconut and hand bit), cocoa powder, vanilla essence, a stabilizer, as well as an emulsifier-- however it does preference and also appear like delicious chocolate as soon as melted. At 10EUR (~$ 11) per 150 g or 10 refills, it's not inexpensive. We wonder to see whether an at-home chef wanting to save some money can mix up their very own uniformity of chocolate and try and insert it into the device. That being stated, we were able to obtain in between 5 to eight items published per refill, relying on their dimension. And, if you're questioning mess, there is a little bit. Melted delicious chocolate isn't the neatest food, yet it's excusable if you have obtained a sink and paper towels nearby. Mycusini Club. The "Club" is by far the coolest part of the Mycusini and also it's what truly takes your creativity to the following level. The cost-free device offers thorough YouTube video clips to assist familiarize you with the machine, however a lot more notably, it offers you the power to produce all sort of styles and also models with your printer. One of the offers on the platform lets you attract what you want the machine to print straight on your screen and afterward have your Mycusini print it in delicious chocolate. It functions truly well and also-- in the hands of better musicians than we are-- could likely yield some pretty excellent deals with. If you're even more of a drawing within the lines kind of individual the trace outlines function is a great option for assisted-coco-artistry. Simply publish a photo of what you want to publish and afterward use it as a guide to trace out what you want. So we had much better great motor control ... After that, there are 2 alternatives to produce text, either in joined-up writing or not. This is wonderful for printing individuals' names, phrases, ideal wishes and also even more. You can publish multiple blocks of text at the same time that makes it a rather efficient function. Lastly, the Mycusini also has a beta setting that lets you put in any type of STL documents as well as (try to) publish it. Considering that this is chocolate though, it's not likely all your prints will function. Last Ideas. Make no bones regarding it: This is a truly amazing machine. It's flexible, easy to use and though it's not ideal, it's very encouraging. We like the control of the Mycusini club deals and had a lot of fun producing edible art.
0 Comments
 Artillery throws its second budget plan best 3D printers in the ring. However, can the Artillery Wizard beat the competitors? Here's what we discovered in our 10-hour evaluation.
The Shenzhen based company Artillery was founded just recently in October 2018, however, with the release of its initial printer, the Weapons Sidewinder X1, they already managed to produce a deserving competitor to the Creality CR-10, right off the bat. Artillery is constantly extremely crazy about enhancing its printers based upon neighborhood comments. Their new as well as smaller model, the Artillery Wizard, was launched in mid-October 2019. Join us as we dive rashly into its specs and figure out if it lives up to the assumptions. Function Check After the area articulated their absent needs on the Weapons' previous bet, the Sidewinder X1, the Chinese-based supplier has increased the expectations for improvement on its Genius version. Yet does it truly follow its name? Let's learn what the latest model brings to the table. Patented Z-axis Coupler Weapons' patent-pending Z-nut coupler (Resource: Artillery). Z-banding is always a problem when it comes to FFF prints. Artillery appears to have taken better gauges to boost the accuracy of its most recent model and created an exclusive nut coupler system. According to the producer, this ought to solve the minor layering problems the company's predecessor, the Artillery Sidewinder X1, had to deal with. We can state after checking the Genius that we are underwhelmed with the Z-axis positioning. Outcomes may be somewhat far better than previous Artillery releases, but not quite to a constant degree (see Benchmarking). " Enhanced" Belt Wheel System. Say goodbye to tightening your belt? The trouble lingers (Resource: Artillery). Some customers have published out Do It Yourself Z-tensioners for the Sidewinder X1. We anticipated Weapons to deal with all the feedback and issues articulated back from the community when developing the Brilliant, boosting the z-axis belt pulley-block system, which ought to cause a total even more stable printing experience. Nevertheless, after evaluating the Wizard we can not support Artillery's claims. The belt wheel system had a loosened belt and extra tensioners are still required. Rapid Heating Publish Bed. The AC warmed bed mechanism (photo: All3DP). Yet another feature Artillery upgraded is the (also) much faster home heating print bed. While the Sidewinder X1, geared up in its 4th version with an Ultrabase, instead of the formerly made use of glass bed, was currently warming up to 80 ° C in just under two minutes. Weapons have currently gone further, as well as the Brilliant's Ultrabase-equipped bed is now capable of reaching up to 100 ° C in regarding the very same quantity of time. We've located this function substantially satisfying. We can likewise include that we have viewed broadband in the nozzle home heating, which we enjoyed. Car Bed-Leveling Ready. In case you obtain fed up with turning screws-- Automatic bed leveling is feasible (picture: Artillery). In its vanilla state, the Artillery Wizard just features hand-operated bed leveling. Weapons left some space for Do It Yourself renovations. The equipment currently reserves bed-leveling connectors, enabling the individual to easily update the printer. To find out extra, take a look at our guide to BL-Touch sensing unit systems. Straight Drive Extruder. The maker uses a Direct Drive Extruder (photo: Artillery). To take care of the wide range of materials, the Weapons Wizard is claimed to do; a direct drive system is indispensable. Somehow, a direct drive extrusion system can be above a Bowden system, specifically if you manage flexible or intricate filaments, such as TPU. Quiet Stepper Chauffeur. No, the sleeping female is not consisted of in the package (Source: Artillery). Being silent is certainly an advantage for any kind of FFF 3D printer (better yet, any kind of device). According to Weapons, their previous printer, the Sidewinder X1, was already quieter than most encased best 3D printers, which we discovered to be partially true in our 10-hour review of the Sidewinder X1. We were interested in identifying whether Artillery handled to tone down the operating sound with their brand-new Brilliant. After printing with it, we can claim that the Wizard is at least as silent as a Prusa i3 MK3S in quiet mode-- a commendable achievement. Further Functions. Extra functions of the Artillery Genius consist of: - TFT Shade Touch Display. - Return to print function after power loss. - Filament runout discovery. - Inductive Sensor Endstops. Benchmarking. To get a great impression for our Weapons Wizard evaluation, we printed both torture tests on a brand-new, unchanged and newly unboxed device, utilizing PLA filament and also balanced slicer settings for the arrays specified for the material. Benchmarking Things 1: Benchy. Despite having a great dimensional precision, the bench had irregular layers and also a poor surface area. A slight over extrusion exists in the door structure. (Resource: All3DP). We made use of white eSun PLA+ filament. For preparing the required G-code, we made use of the slicing software program Repetier Host V2.1.3 consisted of on the offered SD card. The memory drive also consists of a Slic3r arrangement bundle that requires to be filled into Repetier's Slic3r engine (or additionally, straight right into your favored version of Slic3r itself). While not as straightforward as filling a Cura account, it functions well enough, and also the process is outlined in the included directions. We established the hot-end temperature to 215 ° C as well as the bed to 60 ° C for the benchmarking process. It took us 1 effort to 3D print a Benchy after packing the Slic3r config. The surface area is average throughout the print. No significant thick layers are seen throughout the bow, however, the z-axis does show an inadequate alignment. (Source: All3DP). We measured the physical measurements of the print. The Artillery Brilliant achieved 14 out of 15 factors. We located numerous problems at the aesthetic inspection. - Surface areas: The surface's outcomes were not excessively pleasing at the visual examination. To start with, we discovered some under extrusion in the print. We also located a poor Z-alignment. The bow's overhang presented also inconsistent layering. - Details: The outcomes were somewhere satisfactory. The helm was under extruded as well as the front window frame had a variable size on the vertical axis. The box and the chimney were perfectly published as well as maintained their relative proportions. - General uniformity: The general consistency was satisfactory, yet much from outstanding. Several of the major elements to deal with are the irregular layers as well as the under extrusion at different factors in the print. Benchmarking Item 2: Kickstarter Autodesk Test. An over extruded layer stands apart below the spikes platform, as well as stringing in the spikes. (source: All3DP). The Autodesk Kickstarter test model looks at an FDM printer's precision. We made use of the very same white eSun PLA+ filament as well as the same temperature settings (215/ 60). Digging much deeper right into the arrangement could assist this print. We wish there was a larger renovation on its vanilla state. (Resource: All3DP). With a score of 18 of 30 factors, the Artillery Wizard provided only average results. While checking the test visually, we discovered numerous problems: - Surfaces: The primary problem that we can identify was the poor Z-axis positioning, which was consistent through the benchmarking. An additional issue was seen in the numbers accompanying the fine adverse functions. Also, the surface area had little spikes left by the melted plastic upon finishing the details. - Details: The Brilliant succeeded in the fine negative features. The other details were typically poor, as well as we found the numbers to be a little diffused. We additionally discovered some messy layers in the targets, specifically on the ~ 10 mm one, which showed some over extrusion. This issue can be minimized (as well as potentially removed) by lowering the printing rates. Yet, with the vanilla state, this error messed with both the dimensional precision as well as aesthetic inspection. - Consistency: The total uniformity was poor. Benchmarking Decision. This tower came off the Wizard with little problem (Resource: All3DP). The Artillery Brilliant is a promising printing system, yet understand that as an individual you might require to spend time tweaking your slicer setups to obtain the very best possible top quality out of the device. After roughly 10 hrs of printing, we can state that the outcomes are certainly good, yet could utilize some sprucing up also. An added test print (see over) displays excellent information and also top quality. There were only 2 visible issues, the first being some mild banding in the Z-axis. The second problem, while more subtle, is that great information parallel to the y-axis was not as well specified. Our team believes this to be an indication that the default printing speed is too high, as the weight of the bed has not been compensated for. We simulated the fast heating bed and the speed at which the nozzle warms up. We were likewise favorably satisfied with cable television management, which was exceptional. You will need to have some patience to get the optimum settings running on this maker. Technical Spec. BASIC REQUIREMENTS. - Innovation: FFF. - Year: 2019. - Assembly: Pre-assembled. - Mechanical arrangement: Cartesian Design. - Supplier: Weapons. 3D PRINTING CHARACTERISTICS. - Construct quantity: 220 x 220 x 250 mm. - Feeder system: Straight Drive. - Print head: Single nozzle. - Nozzle dimension: 0.4 mm. - Max. warm temperature: 240 ° C. - Max. warmed bed temperature: 130 ° C. - Print bed product: Steel. - Structure: Aluminum. - Bed progressing: Semi-Automatic. - Connectivity: USB, TF-Card. - Publish recuperation: Yes. - Filament sensor: Yes. - Camera: No. PRODUCTS: - Filament size: 1.75 mm. - Third-party filament: Yes. - Filament materials: PLA, ABDOMINAL MUSCLE, TPU, Flexible, Timber, PVA, HIPS. SOFTWARE PROGRAM. - Advised slicer: Cura. - Os: Windows, Mac. - File kinds: STL, OBJ, AMF. DIMENSIONS AND WEIGHT: - Frame dimensions: 430 x 390 x 510 mm (590 mm with spool owner). Weight: 8.9 kg. 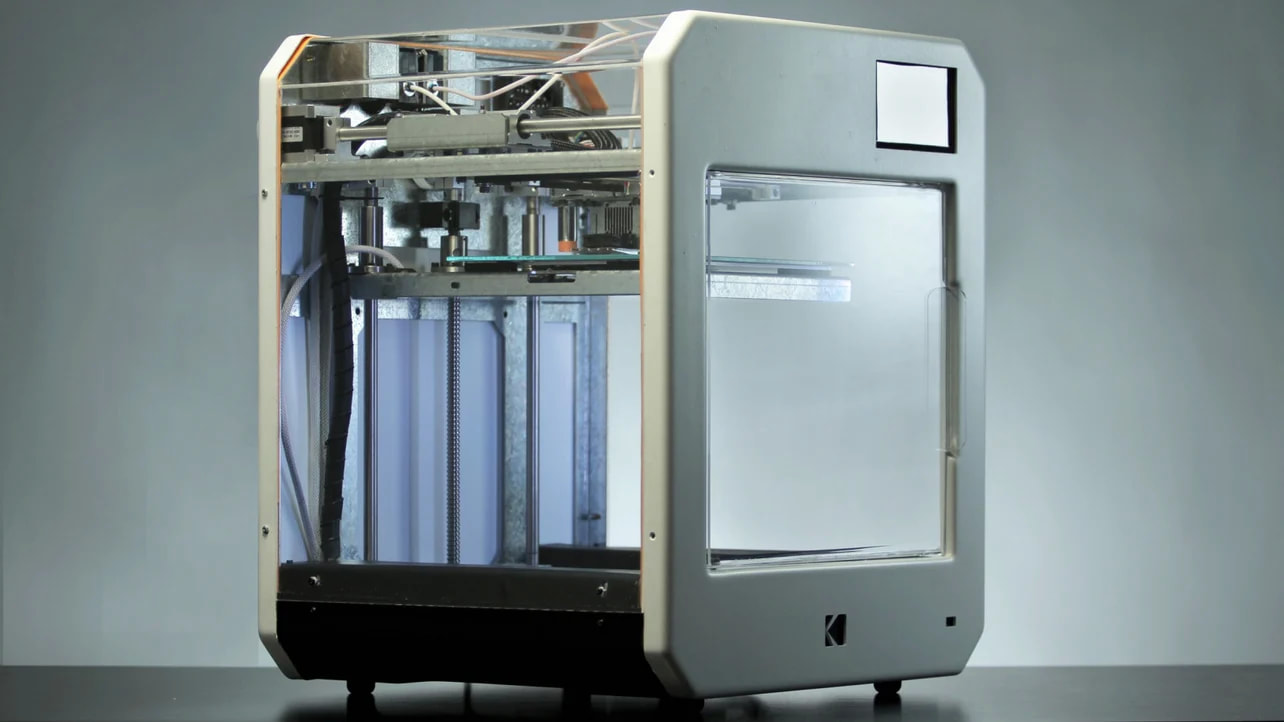 The Kodak Picture is an exciting device that should have the likes of Ultimaker fretted. Review our evaluation to see what we found after 10 hrs of screening.
The sub-industrial market for best 3D printers is perhaps more competitive than it has ever been. Low-cost 3D printer sets have gutted the hobbyist market, leaving suppliers of what one may think about premium products in this field to double down on the specialist dollars. It is right here that the historic imaging business Kodak is tossing its chips. Disclosed at type next 2018, Kodak's debut 3D printer, the Kodak Picture, is ready for its close up. The printer was not developed by Kodak itself, however. The Picture is the work of Argentinian start-up Smart International, which successfully pitched for the civil liberties to make use of Kodak's remarkable name. Folding right into Kodak's new picture as a brand for imaginative experts, the Kodak Picture is a front runner debut for the company, bringing with it an ecosystem of products, quality of life attributes consisting of cloud-connectivity and control, plus maker material accounts for plug-and-play operation. We saw the printer up close at type next as well as can verify that it looks the business. There are few printers that you run into with no visible or prompt problem, and the Kodak Portrait is one of them. Right here's the full skinny on the specifications and functions. Feature Check The Kodak Portrait is an expertly pitched double extrusion fused deposition modeling (FDM) 3D printer. Valued at $3,499, it rests squarely amongst the similarity the MakerGear M3-ID as well as BCN3D Sigma R19 worrying rate as well as capacity. Double Publish Cores Multi-material printing is taken care of on the Kodak Portrait using a twin print-core style print head that resembles Ultimaker's "Print Core" principle, presented in the Ultimaker 3. Approving any combination of PTFE and all-metal hot ends to fulfill a wide variety of product demands, it's interesting to see such a system gain grip. In spite of their resemblances, Kodak's application requires a little much more manual labor in getting rid of the print head real estate to make the switch. The inactive nozzle is mechanically withdrawn free from the print to aid in avoiding oozing and also produce tidy changes between colors and products. Through our testing, we discovered the system to function well, although printing a gunk guard on multi-material prints is still a great concept. Filament Cartridges Feeding this functional print head is a twin Bowden extruder plan, which is in turn fed from one of the lot more fascinating incorporations of the Kodak Portrait-- reusable moisture-resistant filament cartridges. Not one of the most high tech of attributes-- basically 2 lockable clear plastic situations with areas for silica pouches-- these Kodak filament-compatible devices mean that it's feasible to load up hygroscopic filaments such as Nylon (which belongs to Kodak's ecosystem of products for the printer) and also print for days without worry of moisture-induced torment. It's not advanced, but a thoughtful rarity. We found that these filament cartridges are simply a little as well small for some of our filament reels, significantly our white benchmarking filament. While flawlessly sized for Kodak's 0.75-kg spools, the cartridges are simply not broad adequate to fit a full-sized swimming pool. Publish Area & Temperatures The Kodak Picture has a 200 x 200 x 235mm print quantity, with a detachable glass bed that snaps into place utilizing magnets. Home heating to 105 and 295 levels Celsius specifically, the bed and warm ends are so to aid the device in tackling a wide variety of products including HIPS, PETG as well as numerous qualities of Nylon. Our one grievance is the bed leveling: To level the bed, one must make use of the touchscreen interface. While this might sound great at first, we found it very frustrating and sluggish, especially as the pre-programmed increments are so little that it is hard to inform in which direction the bed is relocating. There is no bed level sensor to speak of, as well as the nearly comical design features no chance to physically level the bed-- no knobs, no nuts, no levers, absolutely nothing. You go to the mercy of the software application to call in a good very first layer. Shut Frame as well as CoreXY Kinematics A rigid all-steel framework with clear acrylic sides as well as ceiling completely encloses the print chamber, developing a friendly setting for printing temperature-sensitive products. A HEPA and activated carbon air filter tackle the VOCs launched throughout the printing process, up to a point. The mobility system includes straight rails for security in the X and Y axes and an accuracy sphere screw for the Z-axis, in a CoreXY setup. Cloud-Based Printing & Control Pitching for uncomplicated operation, Smart International decided to make use of the experience of 3DPrinterOS for print work generation, printer control, and farm monitoring. Skinned in Kodak's unique yellow color and also branded as Kodak 3D Cloud, the resulting software application as well as printer UI prioritizes simplicity, with Kodak material profiles eliminating the uncertainty and trial-and-error typically needed in printing. Operable using a web browser from anywhere with a web connection, this cloud method to publish management allows the Picture to slot right into a network of makers without tons on the maker itself. An inbuilt Raspberry Pi 3 keeps things humming along, with straight operation feasible using the printer's 5-inch color touchscreen. Offline operation is additionally feasible using the Kodak 3D Slicer for print preparation, shifting print work to the Picture using LAN or USB. On The Whole, the Kodak Portrait is an interesting suggestion. Consisting of a collection of quality of life features that the straight competition lack for a comparable cost factor sends out a clear message, and with a bankable household name put across the front of the machine it is, undoubtedly, one of the even more interesting best 3D printers to introduce in the past year. Benchmarking For a very first look at the Kodak Portrait, we printed the two most popular torture tests on a brand-new, newly unboxed and unaltered equipment, making use of PLA filament and balanced slicer setups for the arrays specified for the product. Benchmarking Item 1: Benchy We used white eSun PLA+ filament. To prepare the G-code, we utilized Kodak's rebranded 3DPrinterOS cloud slicer, adapting the existing accounts for PLA+. The temperature was readied to 215 ° C and also the bed to 60 ° C. It took us one effort to 3D print a Benchy. We obtained respectable outcomes on the first try, so we gauged the physical measurements of the print (dive to the detailed outcomes here). The Benchy overall ended up halfway decent, the Kodak Portrait accomplished 13 out of 15 points. The visual assessment revealed some various other underlying troubles. - Surface areas: The primary problem was acne and also lobbying, which is an indicator that the retraction may require adjusting. The total surfaces were well-printed without indications of under extrusion, yet there was some z-axis banding. - Information: The details were all rather well specified, in spite of some tiny went down loops in the hawsepipes and also home windows. The plaque on the rear of the Benchy was nearly readable, which is quite excellent for an initial go at printing. - General uniformity: The print had minor disparities, especially related to pimples on the surface area quality. The Benchy had relatively excellent Z-axis alignment overall. Benchmarking Things 2: Kickstarter-Autodesk Examination The Kickstarter-Autodesk test version considers an FDM printer's accuracy. We made use of the very same white eSun PLA+ filament and also the very same temperature setups (215/ 60). With a rating of 19 out of 30 points, the Kodak Portrait did fine, but not superior. Regardless, the dimensional accuracy was outstanding. We found issues with fine flow control, great negatives, and XY vibration. - Surfaces: Once more, the examination things had a bit of stringing as well as bobbing on the surface, the result of insufficient retraction during traveling relocations. Aside from that, as well as some minor ghosting, the surface areas of the print turned out fine. - Details: The spikes were a bit fragile and short as a result of extreme stringing, as you can see above. - Uniformity: The total uniformity was average. You can see thick stringing between all the spikes, some of which were broken, the bridges essentially fell short, and the first layer was irregular. Benchmarking Judgment This dual-color Aria appeared stunningly in Kodak PLA+ (Yellow) as well as Challenging PLA (Black). While the measurements of our benchmarking examination prints are rather middle-of-the-road, an aesthetic examination of the prints points to a handful of concerns, mostly related to extruder calibration (appropriate to the specific problems of our benchmarking prints). An extra print (see over) turned out extremely: Using the given accounts for dual-extrusion in the cloud slicer, with no added calibration or tweaking, we were able to attain a magnificent two-color print. With just some light stringing and also an extremely mild amount of color cross-contamination, the design was near without concerns worth complaining around. Making use of Kodak's products and also matching presets, we did not face any type of issue while printing. This leads us to the verdict that for those who intend to stay within Kodak's community, printing ought to be straightforward and fairly simple with good results. Nonetheless, for those seeking to print with various other brand names of products, some additional tweaking will be called for. specifications. GENERAL SPECIFICATIONS. - Modern technology: FDM. - Year: 2018. - Assembly: Fully put together. - Mechanical setup: CoreXY. - Supplier: Kodak (Smart International). MATERIALS. - Filament diameter: 1.75 mm. - 3rd event filaments: Yes. - Compatible products: Kodak ABS, Flex 98, HIPS, Nylon 6, Nylon 12, PETG, PLA+, PLA Tough, PVA, other 3rd-party. 3D PRINTING FEATURES. - Accuracy: XY +/ -12.5 micron, Z +/- 2.5 micron. - Layer height: 20-- 250 microns. - Feeder system: Bowden. - Extruder type: Single print head-- double hot end. - Nozzle size: 0.4 mm. - Max. extruder temperature level: 295 ° C. - Max. warmed bed temperature: 105 ° C. - Max. print speed:- - Shut print chamber: Yes. - Bed progressing: Assisted Manual. - Publish bed: Heated. - Present: 5-inch color touchscreen. - Connectivity: WiFi, LAN, USB. - Integrated electronic camera: Yes. - Additionals: HEPA + activated carbon air filter, moisture-blocking filament cartridges.  The Qidi Technology Darkness 5.5 S is a brand-new contender on the budget plan resin best 3d printers market. Let's assess the specifications.
The Chinese supplier Qidi Modern technology was founded in 2012 and because has actually ended up being popular for enclosed FDM printers for the enthusiast and also semi-professional market. Currently, Qidi Technology has stepped on brand-new grass and also launched its first SLA material 3D printer, the Shadow 5.5 S. With the playground of budget material 3D printers already crowded, let's see just how the new kid on the block faires. If it can hold up with the huge kids, join us as we examine the specifications of this printer and also see. Features The fact that the Qidi Tech Shadow 5.5 S looks like Iron Man had a youngster, there are likewise some intriguing functions loaded right into its streamlined looking style. To learn a lot more, continue reading and see what the Qidi Technology Shadow 5.5 S brings to the table. Resolution When it pertains to material printers, the printer's LCD display resolution is among the most important aspects, as it figures out the print quality outcome. The Qidi Technology Darkness 5.5 S supplies a 2K resolution LCD (2560 x 1440 pixels), putting the printer in the same organization as it's budget plan competitors Elegoo Mars or the Phrozen Shuffle S. With an XY-axis positioning accuracy of 0.047 mm and Z-axis placing accuracy of 0.001 mm, incorporated with the Side anti-aliasing, the Qidi Technology Shadow 5.5 S needs to be capable of very described prints. Worrying the print area size, the Qidi Tech Shadow 5.5 S includes a maximum of 115 x 65 x 150 mm, which is also quite typical on desktop LCD-based resin printers. Durable Style Iron Male would certainly take pride in this sturdiness (Resource: Qidi Tech). The print quality of LCD based printers usually is extremely high, due to the technology itself and also partly due to the reality that there are just much less relocating parts compared to an FDM design printer. Nonetheless, if any type of part is prone to wobble during operation, it's the Z-axis, specifically at the limit of the developing volume. To lessen any kind of prospective wobbling, the Qidi Tech Darkness 5.5 S is geared up with a dual Z-axis direct rail layout. This should get rid of wave patterns, leading to a smoother finish and in general much better print results. Besides the improved Z-axis security, the Qidi Technology Shadow 5.5 S additionally seems to have a durable and well-balanced body. With an approximate weight of about 7.5 kg, you can be sure the printer stays throughout the procedure. Air Filtration. Two are far better than one-- the Darkness's carbon purification system (Resource: Qidi Technology). When handling material, it is encouraged to avoid skin contact. The very same chooses to breathe in the fumes. It seems like Qidi Technology took that into account and also outfitted the Darkness 5.5 S with, not simply one, but 2 air purification filters; situated within the printing chamber. This dual-fan carbon purification system needs to reduce smells along with screen out ultrafine bits, making it eligible to be utilized in work environments or various other enclosed spaces. In addition, the carbon filters seem to be interchangeable, to ensure a long-time performance. On the very same note, Qidi has established its proprietary material with low smell to additionally lessen the-- SLA acquire-- odor. Support. Qidi Technology is renowned for its customer service's online reputation. Not only does the firm have a very dedicated post-sales group, helping its customers by means of phone or email should any problem happen-- something hardly ever discovered in Chinese budget best 3D printers suppliers-- however also on the supplied USB stick, there are already instructional video clips for any preflight settings in addition to troubleshooting options, such as changing the LCD display. Although this equipment is plug & play, this must permit technically unskilled individuals to get over small and major troubles. Specifically, as the customer neighborhood is not (yet) as big as various other firms, it's nice to understand there is a functioning customer service to fall back onto. Further Features. Additional significant features include: ChiTu Box Slicer. 3.5 in touchscreen with intuitive UI. QIDI TECHNOLOGY SHADOW 5.5 S: EVALUATION THE SPECIFICATIONS. Tech Specs. Here are the technical specs for the Qidi Tech Shadow 5.5 S: BASIC SPECIFICATIONS. Technology: MSLA. Year: 2019. Setting up: Fully-assembled. Maker: Qidi Technology. 3D PRINTING SPECS. Construct Quantity: 115 x 65 x 150 mm (4.52 x 2.55 x 5.9 in). Layer Height: 10 microns. Resolution: 2560 x 1440 pixels. XY-axis resolution: 0.047 mm. Z-axis positioning accuracy: 0.001 mm. Printing Rate: 20 mm/h. Bed-Leveling: Semi-automatic. Show: 3.5 on a touchscreen. Third-Party Products: Yes. Materials: 405 nm UV resin. SOFTWARE APPLICATION NEEDS: Recommended Slicer: ChiTu Box. Operating system: Windows/ Mac OSX. File kinds: STL, SLC, OBJ. Connection: USB. DIMENSIONS AND ALSO WEIGHT: Structure measurements: 245 x 230 x 420 mm. Boxed size: 315 x 290 x 605 mm. Weight (jam-packed): 9.8 kg.  The Sapphire Pro is an intriguing FDM best 3d printers with a CoreXY-style setup. Review our evaluation to see what we found after 10 hrs of screening.
2 Trees, the Chinese printer manufacturer, has released a brand-new affordable device in the form of the Sapphire Pro, an updated version of their previous Sapphire S. With a print location as well as equipment size comparable to an Ender 3, the Sapphire Pro has a cube form as well as makes its mark with a CoreXY belt setup. It's advertised as quick, exact, and also dependable, with some state-of-the-art features to boot. Selling for a price point right around $300, the Sapphire Pro is marketed to enthusiasts as well as novices on a midrange spending plan. A few of the promoted functions consist of linear rails on the X as well as Y axes, as well as a twin equipment BMG Bowden extruder as well as a filament monitor for enhanced reliability. With this in mind, the Sapphire Pro seems to be quite a deal, with features usually seen just in printers at least twice its asking cost. Function Inspect This cube of equipment has lots of sophisticated components (Source: All3DP). The Sapphire Pro seems to be a really promising platform, with an excellent collection of attributes that you would not expect to see on a printer in this price variety. Let's break down one of the most prominent requirements to see what this printer really supplies. CoreXY Movement System. The belt system on the Sapphire Pro is based on CoreXY kinematics (Resource: 2 Trees). The Two Trees Sapphire professional functions CoreXY kinematics, which theoretically enables it to publish much faster than other types of printers. The factor for this is that the electric motors are fixed, so the "flying mass" of the print head and gantry are substantially minimized. Consequently, this leads to fewer resonances during a print, decreasing artifacts like buzzing as well as ghosting throughout a print, and also enhancing accuracy even at higher speeds. From our regards and also examinations, this system works well, even though the belts are not effectively straightened (a typical problem with budget plan CoreXY builds). An additional layout problem with the kinematics is that the X-axis limitation button does not have sufficient clearance, indicating that the ends of the belts hinder as well as stop it from triggering. This has caused us to carry out several emergency-stops to stay clear of damaging the motors. Direct Rails. The direct rails on the Sapphire Pro ensure smooth movement of the gantry and tool head. (Source: All3DP). The best pair for a CoreXY system, direct overview rails on the horizontal X and Y axes guarantee smooth motion and also reduced wear-in time. Generally only seen on professional-grade printers, these are a welcome view in the pastime 3D printing arena, indicating a relocate to higher quality builds at reduced price factors. The incorporation of these excellent quality components indicates that regardless of some troubles with the belt course layout, the printer should remain dimensionally precise. Robin 32-Bit Control Panel with Trinamic (TMC) drivers. Under the hood of the Sapphire Pro is a Makerbase MKS 32-bit Robin Nano control panel, featuring TCM2208 stepper motor chauffeurs. The 32-bit processor on the Robin enables the Sapphire Pro to quickly and also successfully run calculations as well as a coordinated movement without missing a beat. The TMC2208 stepper motor motorists permit the printer to run silently and smoothly, thanks to reliable and also peaceful power cycling and "StealthChop" functionality (a noise-reducing attribute constructed right into the TMC vehicle driver chips). Something we noted while building the equipment is that only the X and Y electric motors have TMC stepper chauffeurs, while both the Z-axis and also the extruder usage other, probably less costly, stepper drivers that do not include the silent running capabilities. Car Levelling. The Sapphire Pro consists of the capacity to auto-level with a little detachable sensor. A pressure-based system, the printer will probe the bed by tapping at several indicate produce a data grid, allowing the software to deal with for variances. To some Delta printers where tool head area and also weight are at a cost, the sensor has to be removed before printing. BMG Twin Equipment Extruder with Filament Sensor. The dual gear extruder helps boost reliability as well as accuracy throughout printing (Resource: All3DP). One of the various other functions that are brand-new to see on hobby printers, a BMG dual equipment extruder is installed sideways of the Sapphire Pro. This system is based upon prominent BondTech extruders, with two gears gripping the filament, as opposed to a single gear and also a bearing. Contrasted to various other extruders, the BMG configuration can better push filament via the Bowden tube, with many reduced opportunities of jamming or stripping the filament thanks to the added gripping power. Also included is a mechanical filament sensing unit, which can find if the filament runs out or breaks, pausing the print. This implies that you don't require to keep as close an eye on your filament reels, specifically for long prints. Benchmarking. To start with our 2 Trees Sapphire Pro review, we published both abuse tests on a brand-new, unchanged and freshly unboxed equipment, using PLA filament and averaged slicer settings for the ranges defined for the product. Benchmarking Item 1: Benchy. A fairly clean print, the most obvious problem is drooping in the tops of the windows and doors (Resource: All3DP). We made use of white eSun PLA+ filament. For preparing the needed G-code, we used the cutting software application Cura included on the given SD card. We established the hot-end temperature to 215 ° C and also the bed to 60 ° C. It took us one effort to 3D print a Benchy. While the details are rather distinct, some small z-axis disparities can be found in between layers (Resource: All3DP). We measured the physical dimensions of the print. The Sapphire Pro attained an excellent 13 out of 15 factors. The visual assessment was also great, with a couple of problems. - Surfaces: The surfaces generally turned out quite possibly, with little in the means of issues. - Information: The information in the 3DBenchy was normally good. Some sagging layers existed under the watercraft's doors, which is a usual problem, however, no loops were gone down. The letters on the base were well printed, evidence of the excellent bed bond. - Overall uniformity: The total consistency was pretty good. The only problems were some instead thick strings, and also a very minor amount of wobble in the Z-axis. Benchmarking Item 2: Kickstarter Autodesk Test. Not the worst we've ever before seen, despite the messy stringing the measurements are nearly spot-on (Source: All3DP). The Autodesk Kickstarter examination version looks at an FDM best 3d printers accuracy. We used the very same white eSun PLA+ filament and also the very same temperature setups (215/ 60 ° C). The outstanding fine downsides were offset by some thick stringing and negative bridges in the circulation control section of the examination (Resource: All3DP). With a score of 20.5 of 30 factors, the Two Trees Sapphire Pro carried out well. Determining apart, while examining the printer test visually, we discovered a number of issues: - Surfaces: In A Similar Way to the Benchy, surface areas were not an issue for this printer. - Details: In vanilla-state, the Sapphire Pro did a fairly good work on the details, however, it might have done better. 5 out of 5 great adverse pins were removable, nonetheless, the bridging was less than optimum in places. The penalty circulation control was lacking, as all of the spikes had thick, hefty stringing. - Uniformity: The consistency of the Kickstarter examination was excellent. On the whole, this printer held up to our expectations based upon our first check out the equipment. Benchmarking Decision. This engine block, published in clear orange PLA, exhibits exceptional precision and also information (Source: All3DP). While the physical measurements of our benchmarking examination prints are excellent, upon visual inspection of the prints we were able to locate some problems, the majority of which our team believes are related to retraction. An added print of an engine block (see over) turned out exceptional: Even with the stock slicer setups, the support came off conveniently, as well as details were extremely well defined. All points taken into consideration, we would certainly state that the supply 2 Trees Sapphire Pro appears to operate all right for a beginner to start 3D printing, but to accomplish outright perfection you will definitely require to fiddle with the slicer setups. Please proceed right here if you want to recognize in detail exactly how we standard. 2 TREES PEARL PRO 3D PRINTER: REVIEW THE SPECS. Technical Spec. The Sapphire Pro includes twin-turbo component cooling followers (Source: All3DP). GENERAL SPECIFICATIONS. - Innovation: FFF. - Year: 2019. - Assembly: Partly set up. - Mechanical plan: CoreXY. - Supplier: Two Trees. 3D PRINTING FEATURES. - Construct quantity: 235 x 235 x 235 mm. - Layer elevation: 0.1 mm. - XYZ resolution: 0.01 mm, 0.01 mm, 0.0025 mm. - Feeder system: Bowden. - Extruder Type: Twin Gear BMG. - Nozzle kind: J-Head. - Nozzle dimension: 0.4 mm. - Max. extruder temperature level: 260 ° C. - Max. heated bed temperature: 100 ° C. - Frame: Aluminum. - Bed progressing: Guidebook, Automatic (detachable sensing unit). - Max. Print Rate: 300 mm/s. - Max. Travel Speed: 1000 mm/s. - Connection: USB, TF-Card. - Build-in electronic camera for monitoring: No. - Ordinary operating noise: < 60dB. - Print healing: No. - Display: Touchscreen control. PRODUCTS: - Filament diameter: 1.75 mm. - Third-party filament: Yes. - Filament materials: PLA, ABS, TPU, Flexible, Timber, PVA, HIPS. SOFTWARE PROGRAM NEEDS: - Os: Windows, Mac. - Suggested Slicer: Cura. MEASUREMENTS AND ALSO WEIGHT: - Assembled measurements: 405 x 360 x 480 mm. - Weight: 11.5 kg. - Delivery weight: 14.0 kg.  When a person has actually a significantly harmed cornea, a corneal transplant is called for. 2,000 people are waiting for the cornea contribution in the nation as of 2018 and they wait for 6 or even more years on average for the contribution. Because of this, several researchers have actually placed their efforts in establishing a man-made cornea. The existing man-made cornea makes use of recombinant collagen or is constructed from chemical compounds such as an artificial polymer. Therefore, it does not include well with the eye or is not clear after the cornea implant.
Professor Dong-Woo Cho of Mechanical Engineering, Professor Jinnah Jang of Creative IT Merging Design, and also Ms. Hyeonji Kim at POSTECH, worked together with Teacher Hong Kyun Kim of Ophthalmology at Kyungpook National College of Medication, 3D published a man-made cornea making use of the bio-ink which is constructed from decellularized corneal stroma and stem cells. Because this cornea is constructed from corneal tissue-derived bioink, it is biocompatible, and 3D cell printing innovation recapitulates the corneal microenvironment, therefore, its transparency resembles the human cornea. This research study is just recently released on Biofabrication. The cornea is a thin outermost layer that covers the pupil and it safeguards the eye from the outside environment. It is the initial layer that confesses light and also consequently it requires to be clear, move as the pupil actions, and have versatility. It has been limited to develop a fabricated cornea utilizing synthetic biocompatible products due to the fact that of various cornea-related buildings. On top of that, although numerous scientists have tried to repeat the corneal microenvironment to be transparent, the products used in existing research studies have actually restricted microstructures to penetrate the light. The human cornea is arranged in a latticework pattern of collagen fibrils. The lattice pattern in the cornea is straightly related to the transparency of cornea, and also several investigates have actually tried to replicate the human cornea. Nonetheless, there was a restriction relating to corneal transplants because of using cytotoxic substances in the body, their insufficient corneal features including low openness, and more. To resolve this issue, the study group made use of shear tension produced in the 3D printing to manufacture the corneal latticework pattern and demonstrated that the cornea by using a corneal stroma-derived decellularized extracellular matrix bioink was biocompatible. In the best 3D printers process, when the ink in the printer appears with a nozzle and also goes through the nozzle, a frictional force which then generates shear stress and anxiety take place. The study group effectively generated clear synthetic cornea with the latticework pattern of the human cornea by regulating the shear tension to control the pattern of collagen fibrils. The study group additionally observed that the collagen fibrils renovated in addition to the printing course produce a lattice pattern comparable to the framework of the native human cornea after 4 weeks in vivo. Professor Jonah Jang said with enjoyment, "the recommended method can accomplish the requirements for both transparencies as well as safety of engineered corneal stroma. Our company believes it will promise to lots of patients struggling with cornea related illness." 3D-Printed 'Hyperelastic Bone' May Assist Generate New Bone For Head Repair Defects of the head, as well as face bones, can pose difficult difficulties for plastic and also rebuilding surgeons. A synthetic product called hyperelastic bone-- readily created by 3D-printing-- might supply an effective new device for usage in rebuilding head flaws, reports a research study in the May issue of Plastic as well as Plastic Surgery ®, the official medical journal of the American Society of Plastic Surgeons (ASPS). The experimental material accelerates bone regrowth throughout skull issues in rats, according to initial results by Camille N. Shah, Ph.D., as well as associates of Northwestern College as well as College of Illinois Wellness, Chicago. The researchers create, "Hyperelastic bone has substantial capacity to be converted to craniofacial cosmetic surgery, where the demand for cost-efficient bone substitute grafts is enormous." Promising New 3D-Printed Bone Replacement for Head Restoration The researchers report first trying outs hyperelastic bone in rats with operatively created flaws of the top of the skull. The surgically produced problems were of a "vital size" unlikely to heal by themselves-- similar to those seen in patients that have actually undertaken surgery for mind lumps. Hyperelastic bone is a "3D-printed synthetic scaffold," being composed mainly of bone mineral (hydroxyapatite) plus a widely used, biocompatible product (polyglycolic acid). Hyperelastic bone contains a detailed latticework, made to sustain the development and regrowth of brand-new bone. It [TO1] can be rapidly and reasonably created using current the best 3D printiners hardware platforms and is flexible enough to be press-fit or cut into form throughout the surgical procedure. In the experiments, some cranial defects were reconstructed utilizing hyperelastic bone and others utilizing the pet's very own (autologous) bone. Autologous bone is the preferred product for reconstructing bone defects, however, it can be challenging to get-- needing bone to be extracted from a "contributor website" in other places in the body-- and also in some cases isn't available at all. In various other pets, reconstruction was done using a scaffold constructed from polyglycolic acid just, without bone mineral. The 3D-printed hyperelastic bone supplied great bone regeneration. On follow-up CT scans, the hyperelastic bone was about 74 percent efficient after eight weeks and 65 percent at 12 weeks, contrasted to the autologous bone. On the other hand, defects treated with the polyglycolic acid scaffold revealed little brand-new bone development. Microscopic evaluation revealed that the hyperelastic bone scaffold was slowly bordered initially by fibrous cells, after that by brand-new bone cells. In time, the scaffold would certainly be gradually replaced completely by brand-new bone, incorporating the dental implanted bone mineral. "Hyperelastic bone has substantial potential to be translated to craniofacial cosmetic surgery, where the need for affordable bone substitute grafts is huge," Dr. Shah, as well as associates, conclude. With further growth, they believe this 3D-printed product might give a valuable option to the autologous bone and also readily available bone replacements. "Our research study underscores the appealing translational possibility of this novel method for cell design applications, specifically bone regeneration," the researchers include. They stress that more experimental studies will be required to verify making use of hyperelastic bone for details sorts of craniofacial restoration.  For the very first time, scientists have effectively 3D printed chalcogenide glass, a one-of-a-kind material used to make optical components that run at mid-infrared wavelengths. The capability of the best 3D printers this glass could make it feasible to manufacture complicated glass components as well as optical fibers for new sorts of low-cost sensing units, telecommunications parts as well as biomedical devices.
In The Optical Culture (OSA) journal Optical Materials Express, scientists from the Centre d'Optique, Photonique et Laser (COPL) at Université Laval in Canada, Patrick Larochelle and also his colleagues, explain just how they modified a commercially offered the best 3D printers for glass extrusion. The brand-new approach is based upon the typically utilized technique of integrated deposition modeling, in which a plastic filament is melted and then extruded layer-by-layer to create thorough 3D objects. " 3D printing of optical materials will pave the way for a brand-new era of designing and incorporating materials to create the photonic elements as well as fibers of the future," stated Yannick Ledemi, a participant of the study team. "This brand-new approach could possibly result in advancement for reliable manufacturing of infrared optical parts at an inexpensive price." Printing glass Chalcogenide glass softens at a relatively reduced temperature level compared to other glass. The research team consequently increased the optimum squeezing out the temperature of a commercial 3D printer from around 260 ° C to 330 ° C to enable chalcogenide glass extrusion. They created chalcogenide glass filaments with dimensions comparable to the commercial plastic filaments normally made use of with the 3D printer. The printer was programmed to create two samples with complicated forms and dimensions. " Our technique is effectively suited for soft chalcogenide glass, however alternate methods are additionally being checked out to print various other kinds of glass," said Ledesma. "This could allow construction of elements constructed from numerous materials. Glass can likewise be integrated with polymers with specialized electro-conductive or optical residential or commercial properties to create multi-functional 3D published devices." 3D printing would also serve for making fiber preforms-- an item of glass that is drawn into a fiber-- with several products or complicated geometries, or a combination of both. As soon as the layout, as well as fabrication methods, are fine-tuned, the scientists say that 3D printing could be made use of for affordable production of high quantities of infrared glass elements or fiber preforms. " 3D published chalcogenide-based components would be useful for infrared thermal imaging for defense and also security applications," continued Ledemi. "They would certainly likewise enable sensing units for contaminant monitoring, biomedicine as well as other applications where the infrared chemical trademark of molecules is used for discovery and also diagnosis." The scientists are currently working to boost the design of the printer to increase its efficiency and enable the additive manufacturing of complex components or elements made of chalcogenide glass. They also wish to include brand-new extruders to allow co-printing with polymers for the advancement of multi-material components. 3D-Printed, Fluid Gadget Could Automate Chemical Synthesis A research team from the U.S. Department of Energy's Lawrence Berkeley National Laboratory has established a new means to 3D print all-liquid gadgets that can enable automated chemical synthesis with applications for batteries and also medication formulation. To attain this, the researchers published liquid containing nanoscale clay particles and liquid having polymer bits onto a specifically patterned glass substratum. This permits the fluids ahead together at the user interface of each other and also creates an incredibly thin channel or tube regarding one millimeter in size within nanoseconds. After several channels form, the scientists placed catalysts in various channels and afterward 3D-printed bridges between channels to link them as well as enable a chemical moving with them to run into stimulants in a specific order. This sets off a cascade of chemical reactions that can ultimately generate particular chemical substances. The researchers also discovered a way to automate the process with a computer system to execute jobs associated with driver placement, build fluid bridges within the device as well as run reaction series required to make molecules. " What we demonstrated is exceptional. Our 3D-printed gadget can be programmed to accomplish a multistep, intricate chain reaction on-demand," Brett Helms, a staff scientist in Berkeley Laboratory's Products Sciences Division as well as Molecular Factory, that led the study, stated in a statement. "What's a lot more fantastic is that this functional system can be reconfigured to successfully as well as exactly combine particles to create very detailed products, such as organic battery materials." The research improves 2018 research where researchers established a brand-new approach to publish different liquid frameworks within another fluid, including beads and swirling strings of fluid. " Afterwards effective presentation, a lot of us got together to conceptualize how we might make use of fluid printing to make an operating tool," Helms stated. "Then it struck us: If we can publish fluids in defined networks as well as flow components through them without damaging them, after that we might make useful fluidic devices for a vast array of applications, from new kinds of miniaturized chemical laboratories to even batteries as well as digital tools." The new tool can be set to work as a synthetic blood circulation system that divides molecules flowing via the network, instantly getting rid of undesirable results all while publishing a sequence of bridges to particular stimulants as well as carrying out the steps of chemical synthesis. " The kind, as well as features of these gadgets, are only limited by the imagination of the researcher," Helms said. "Independent synthesis is an emerging area of interest in the chemistry and materials areas, and also our technique for 3D-printing devices for all-liquid circulation chemistry can help to play a crucial role in establishing the field." To even more boost their technology, the researchers are intending to energize the walls using conductive nanoparticles, broadening the kinds of responses that can be discovered. " With our technique, we believe it needs to additionally be feasible to create all-liquid wiring, fuel cells, and also batteries," Helms said. "It's been really interesting for our group to incorporate fluidics and circulation chemistry in such a way that it is both user-programmable and also user-friendly."  A team of designers at Tufts College has developed a series of 3-D published meta-materials with distinct microwave or optical buildings that go beyond what is possible using traditional optical or electronic products. The fabrication methods developed by the researchers show the capacity, both present, and future, of the best 3d printers to broaden the variety of geometric designs and material composites that result in tools with unique optical residential or commercial properties. In one situation, the researchers attracted inspiration from the compound eye of a moth to develop a hemispherical device that can take in electromagnetic signals from any direction at picked wavelengths. The research was published today in the journal Micro-systems & Nano engineering, released by Springer Nature.
Meta-materials prolong the capacities of standard materials in tools by taking advantage of geometric attributes prepared in repeating patterns at scales smaller sized than the wavelengths of power being discovered or affected. New developments in 3-D printing innovation are making it possible to create many more shapes and patterns of meta-materials, and also at ever before smaller scales. In the research study, scientists at the Nano Lab at Tufts define a hybrid manufacture technique making use of 3-D printing, steel finishing as well as etching to develop meta-materials with complicated geometries as well as novel functionalities for wavelengths in the microwave array. They produced an array of small mushroom-shaped frameworks, each holding a tiny patterned steel resonator at the top of a stalk. This particular setup allows microwaves of details regularities to be absorbed, depending upon the chosen geometry of the "mushrooms" as well as their spacing. Use such metamaterials could be useful in applications such as sensing units in clinical diagnosis and as antennas in telecommunications or detectors in imaging applications. Other devices established by the writers consist of parabolic reflectors that selectively soak up and also send certain frequencies. Such principles might simplify optical devices by combining the functions of representation and filtering systems into one device. "The capacity to consolidate features utilizing metamaterials could be exceptionally beneficial," stated Sameer Sonkusale, professor of electrical and computer system design at Tufts College's School of Engineering who heads the Nano Laboratory at Tufts and also is the corresponding writer of the research study. "It's possible that we might use these materials to lower the dimension of spectrometers and also various other optical measuring devices so they can be made for the portable field research study." The items of integrating optical/electronic patterns with 3-D construction of the underlying substratum are referred to by the authors as metamaterials embedded with geometric optics, or NGOs. Various other forms, sizes, and also positionings of patterned 3-D printing can be developed to create MEGOs that absorb, enhance, mirror or bend waves in manner ins which would certainly be tough to attain with traditional construction methods. There are a number of innovations now available for 3-D printing, and the present research utilizes stereolithography, which concentrates light to polymerize photo-curable materials into the wanted shapes. Various other 3-D printing modern technologies, such as 2 photon polymerization, can give printing resolution to 200 nanometers, which makes it possible for the manufacture of even finer metamaterials that can discover and also adjust electromagnetic signals of also smaller wavelengths, potentially including noticeable light. " The complete possibility of 3-D printing for MEGOs has not yet been understood," claimed Aydin Sadeqi, a college student in Sankusale's laboratory at Tufts University Institution of Design and lead writer of the study. "There is much more we can do with the current technology, as well as a substantial potential as 3-D printing unavoidably evolves." Researchers Create First-Ever 3D Printed Heart Using human cells, Tel Aviv University (TAU) researchers have accomplished a significant breakthrough by creating a biologically customized bioink as well as creating the very first ever-3D printed heart. " This is the first time any person anywhere has efficiently crafted and also published a whole heart abundant with cells, blood vessels, ventricles and chambers," Tal Dvir, a teacher in TAU's School of Molecular Cell Biology and Biotechnology, Division of Materials Science and Design, Facility for Nanoscience and Nanotechnology as well as Sagol Center for Regenerative Biotechnology, said in a declaration. " This heart is made from human cells as well as patient-specific biological materials," he included. "In our procedure, these materials function as the bio-inks, compounds constructed from sugars and proteins that can be made use of for the best 3D printers of complicated cell versions. Individuals have handled 3D-print the framework of a heart in the past, but not with cells or with capillary. Our outcomes demonstrate the possibility of our strategy for designing individualized cells and organ substitutes in the future." In the past, scientists have actually only demonstrated success in printing straightforward cells without blood vessels. The new model is presently only concerning the size of a rabbit's heart, however, the researchers think they pave the way to one day producing a heart large enough for a human. To accomplish this feat, the scientists first biopsied fatty tissue from patients and also divided the acellular and mobile products of the cells. The cells were after that reprogrammed to come to be plenipotentiary stem cells and an extracellular matrix, 3D network of extracellular macromolecules like collagen as well as glycoproteins was processed right into a personalized hydrogel that can work as a bio-ink for the 3D printer. After mixing the cells with the hydrogel, the cells were effectively separated into endothelial or heart cells. This might allow doctors to establish a patient-specific, immune-compatible cardiac patch with blood vessels that are thick, vascularized and also preferable. " The biocompatibility of crafted products is essential to eliminating the danger of dental implant being rejected, which jeopardizes the success of such treatments," Dvir claimed. "Ideally, the biomaterial ought to possess the same biochemical, mechanical and topographical residential or commercial properties of the person's own tissues. Right here, we can report an easy method to 3D-printed thick, vascularized as well as preferable heart tissues that totally match the immunological, mobile, biochemical as well as physiological residential or commercial properties of the individual." Next off, the researchers are functioning to society the hearts in the laboratory and also instruct them how to behave like hearts prior to transplanting them right into animal designs. " We require the printed heart better," Dvir stated. "The cells need to develop a pumping capability; they can presently contract, however, we need them to interact. Our hope is that we will be successful as well as verify our technique's efficacy as well as effectiveness. Possibly, in one decade, there will certainly be organ printers in the finest medical facilities all over the world, as well as these treatments will be performed consistently." Heart disease has actually long been the leading cause of death in the UNITED STATE, with heart transplantation deemed the only readily available therapy alternative for people with end-stage cardiac arrest. There is presently a lack of heart benefactors, and also brand-new strategies are sought to produce more acceptable heart substitutes in various other ways.  Researchers at the College of Minnesota have established the best 3D printers transparent head dental implant for mice that supplies a possibility to watch the task of the whole brain surface in real-time. The device allows essential brain study that might offer new insights into human brain problems such as concussions, Alzheimer's as well as Parkinson's condition.
The research study is released in Nature Communications. Researchers likewise plan to commercialize the tool, which they call See-Shell. " What we are attempting to do is to see if we can envision and also communicate with large parts of the mouse brain surface area, called the cortex, over extended periods. This will certainly provide us brand-new information regarding just how the human mind jobs," claimed Suhasa Kodandaramaiah, Ph.D., a co-author of the research study and University of Minnesota Benjamin Mayhugh Aide Professor of Mechanical Design at the University of Science and Design. "This modern technology allows us to see most of the cortex in action with unprecedented control and precision while boosting certain parts of the mind." In the past, a lot of researchers have taken a look at little regions of the mind and also attempted to understand it in detail. However, researchers are currently finding that what occurs in one part of the mind likely affects other parts of the mind at the same time. One of their initial research utilizing the See-Shell gadget examines just how light traumas in one part of the mind influence various other parts of the brain as it restructures structurally and functionally. Kodandaramaiah claimed that computer mouse brains are really similar in many respects to human minds, and this gadget opens the door for a similar research study on computer mice looking at degenerative mind conditions that impact humans such as Alzheimer's or Parkinson's condition. The technology allows scientists to see international adjustments for the very first time at an extraordinary time resolution. In a video clip created utilizing the device, adjustments in the brightness of the computer mouse's brain correspond to waxing and waning of neural activity. When the whole brain suddenly becomes energetic, subtle flashes are durations. The scientists are still trying to recognize the factor for such worldwide worked with activity and also what it implies for actions. " These are studies we could not do in humans, yet they are incredibly crucial in our understanding of how the brain functions so we can enhance treatments for people that experience brain injuries or illness," said Timothy J. Ebner, M.D., Ph.D., a co-author of the research study as well as a College of Minnesota Professor and Head of the Division of Neuroscience at the Medical College. To make the See-Shell, researchers digitally checked the surface area of the computer mouse skull and then made use of the electronic scans to produce a fabricated transparent skull that has the very same contours as the original head. During a precise surgery, the top of the mouse skull is replaced with the 3D-printed transparent skull gadget. The gadget allows scientists to tape brain tasks concurrently while imaging the entire mind in real-time. Another advantage of utilizing this tool is that the computer mouse's body did not reject the implant, which indicates that the scientists had the ability to study the exact same mouse mind over several months. Research studies in mice over numerous months enable researchers to study brain aging in a manner that would take years to research in humans. " This brand-new gadget enables us to look at the mind activity at the smallest degree focusing on specific nerve cells while getting a big-picture sight of a huge part of the brain surface area with time," Kodandaramaiah said. "Developing the gadget and also showing that it functions is simply the beginning of what we will certainly have the ability to do to advance mind research study." Along with Kodandaramaiah as well as Ebner, the research study team was led by fourth-year mechanical engineering Ph.D. student Leila Ghanbari. The research group included a number of postdoctoral associates, college students as well as undergraduate students consisting of Russell E. Carter (neuroscience), Matthew L. Rynes (biomedical design), Judith Dominguez (mechanical engineering), Gang Chen (neuroscience), Anant Naik (biomedical design), Jia Hu (biomedical design), Lenora Haltom (mechanical design), Nahom Mossazghi (neuroscience), Madelyn M. Gray (neuroscience) as well as Sarah L. West (neuroscience). The group additionally included companions at the College of Wisconsin consisting of scientist Kevin W. Eliceiri and also college student Md Abdul Kader Sagar. The study was funded primarily by the National Institutes of Health And Wellness (NIH) with added assistance from Minnesota's Exploration, Study, as well as Technology Economy (MnDRIVE) funding from the State of Minnesota. Numerous undergraduate students involved in the research study were supported by the University of Minnesota Undergraduate Research Study Opportunities Program (UROP). The imaging research study was made possible by the cutting-edge imaging facilities at the University Imaging. Improving 3D-Printed Prosthetics and Integrating Digital Sensors The growth of the best 3D printers, it's completely feasible to 3D print your own prosthetic from designs found in open-source databases. Those versions do not have individualized digital customer interfaces like those found in costly, cutting edge prosthetics. Now, a Virginia Technology teacher and also his interdisciplinary group of undergraduate student scientists have made inroads in incorporating electronic sensors with individualized 3D-printed prosthetics-- a growth that could one day result in even more budget-friendly electric-powered prosthetics. This freshly published research study out of the lab of Blake Johnson, a Virginia Technology aide professor in commercial and systems engineering, took a step forward in boosting the capabilities of 3D-printed customized wearable systems. By integrating digital sensing units at the junction in between a prosthetic as well as the wearer's tissue, the researchers can gather info about prosthetic features as well as comfort, such as the stress across wearer's cells, that can assist boost additionally versions of these kinds of prosthetics. The combination of products within form-fitting regions of 3D-printed prosthetics using a conformal 3D printing strategy, as opposed to hands-on assimilation after printing, might also pave the way for special possibilities in matching the firmness of the wearer's cells as well as incorporating sensing units at different places throughout the form-fitting user interface. Unlike typical 3D printing that includes transferring products in a layer-by-layer fashion on a level surface area, conformal 3D printing allows for the deposition of materials on bent surfaces as well as objects. According to Yuxin Tong, a commercial as well as systems engineering college student and also an initial writer of the released research study, the supreme objective is to produce engineering practices as well as processes that can reach as many people as possible, beginning with an effort to aid develop a prosthetic for one regional teenager. " Ideally, every moms and dad can adhere to the summary from the paper we published and also create a low-priced personalized prosthetic hand for his/her child," Tong stated. To create the prosthetics incorporated with digital sensors, the researchers began with 3D scanning information, which resembles taking photos at different angles to get the full form of an item-- in this situation, a mold of the young adult's arm or leg. They then used 3D scanning data to lead the assimilation of sensors right into the form-fitting dental caries of the prosthetic using a conformal 3D printing strategy. The procedure developed by the study group will offer itself to more applications in personalized medicine and style of wearable systems. " Personalizing as well as customizing the buildings as well as capabilities of wearable system interfaces making use of 3D scanning as well as 3D printing opens the door to the design as well as manufacture of new modern technologies for human help as well as healthcare in addition to analyzing basic questions associated with the function and also comfort of wearable systems," Johnson stated. Johnson's research into prosthetic hands was influenced when he found out about his coworker's daughter, Josie Fraticelli, then 12-years old, that had been born with amniotic band syndrome. While in utero, the development of her hand quit. String-like amniotic bands limited blood flow and also affected the development of the right hand, creating a lack of development beyond the knuckles. Johnson used his related study proficiency in additive biomanufacturing as well as a team of interdisciplinary undergraduate scientists to 3D print the bionic hand for Fraticelli that would certainly end up being the basis of the now-published research study.  A new best 3D printers technique can enable scientists to create fabricated lumps to test brand-new drugs and also therapies, inevitably causing much better and a lot more tailored medicine.
Designers from McMaster University believe the brand-new method might allow them to create sensible 3D cell collections with several layers of cells to much better imitate the conditions inside of the body as well as get rid of the requirement for pets to study human conditions. " We have developed a design option to conquer current biological restrictions. It has the possible to speed up tissue design technology and also regenerative medication," Sarah Mishriki, a Ph.D. prospect in the College of Biomedical Engineering and lead author of the research, claimed in a statement. "The capacity to quickly manipulate cells in a secure, non-contact and manageable manner permits us to create the distinct cell landscapes and also microarchitectures discovered in human tissues, without the use of a scaffold." The new approach uses magnets to quickly publish 3D cell collections by utilizing the magnetic homes of different materials, including cells. While some materials are strongly at risk of magnets, others are not. Products with a greater magnetic susceptibility experience stronger destination to a magnet and will move in the direction of it; weakly drew in material with reduced susceptibility will certainly be displaced to lower magnetic field regions that lie far from the magnet. The researchers were able to harness the distinctions in the magnetic vulnerabilities of two products to focus only one within a quantity by designing electromagnetic fields and also preparing the magnets in a certain way. "This magnetic approach of generating 3D cell clusters takes us closer to swiftly and economically producing extra complicated designs of biological tissues, speeding discovery in academic labs and also modern technology solutions for the sector," Webtech, a study affiliate, stated in a declaration. The team formulated bioinks by suspending human bust cancer cells in a cell society tool that contained Gd-DTPA, a magnetic salt hydrate that is made use of like an MRI comparison representative for humans. Comparable to other cells, the bust cancer cells are considerably less drawn in by magnets than the Gd-DTPA. When the electromagnetic field was used, the salt hydrate moves towards the magnets, displacing the cells in a fixed area of minimum magnetic field strength, seeding the development of a 3D cell collection. Within just six hours, the researchers had the ability to utilize this technique and also 3D publish a cancer tumor and validated with testing that the salt hydrate was safe to human cells. The researchers currently want to develop much more complicated bioinks that will certainly enable them to publish cell clusters that resemble human tissues better. They also believe that in the future, lumps with cancer cells could be quickly published to check drug action throughout a variety of experiments that can be conducted all at once. They also intend to additional develop their technology so they can 3D print several tissues and also body organs. For scientists to examine different conditions, test medicines and also analyze how they affect human cells, they often have to produce a single layer of animal or human cells in 2D models. Pet models are likewise utilized to track the development of the illness, yet these procedures can be both taxing and pricey. 3D Printed Tissues May Maintain Athletes at work Bioscientists are relocating closer to 3D-printed synthetic cells to aid heal bone and cartilage usually harmed in sports-related injuries to ankles, arm joints, and knees. Researchers at Rice University as well as the University of Maryland reported their first success at design scaffolds that reproduce the physical qualities of osteochondral tissue-- basically, the hard bone below a compressible layer of cartilage that looks like the smooth surface area on completions of lengthy bones. Injuries to these bones, from small cracks to items that break short, can be agonizing and also often quite professional athletes' occupations in their tracks. Osteochondral injuries can also result in disabling joint inflammation. The gradient nature of cartilage-into-bone and also its porosity have made it tough to duplicate in the laboratory, but Rice researchers led by bioengineer Antonios Mikos and graduate student Sean Bittner have actually used 3D printing to make what they believe will eventually be a suitable product for implantation. Their outcomes are reported in Acta Biomaterialia. " Professional athletes are disproportionately impacted by these injuries, however, they can affect everyone," claimed Bittner, a third-year bioengineering college student at Rice, a National Scientific research Foundation fellow and lead author of the paper. "I think this will be an effective tool to assist individuals with common sporting activities injuries." The key is resembling tissue that turns slowly from cartilage material (chondral cells) at the surface area to bone beneath. The Biomaterials Lab at Rice published a scaffold with customized blends of a polymer for the previous as well as a ceramic for the latter with embedded pores that would enable the patient's very own cells and blood vessels to infiltrate the implant, ultimately allowing it to enter into the natural bone and cartilage material. " Essentially, the composition will coincide from individual to person," Bittner said. "There's porosity included so vasculature can expand in from the indigenous bone. We do not have to fabricate the capillary ourselves." The future of the task will include identifying just how to print an osteochondral dental implant that completely fits the person as well as allows the permeable implant to become and knit with the bone and cartilage material. Mikos said the collaboration is a terrific early success for the Center for Design Facility Tissues (CECT), a National Institutes of Health center at Maryland, Rice and the Wake Forest College of Medicine creating bioprinting tools to attend to standard clinical concerns as well as translate new expertise into the scientific method. "In that context, what we have actually done here is impactful and may cause new regenerative medicine options," Mikos said. |
